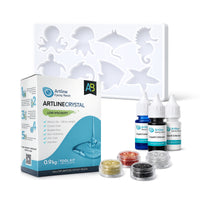
Artline Belen Ortego Resin Art Set for epoxy resin crafting
Belen Ortego Resin Art Set product photo, view 2 — Artline resin supplies
Belen Ortego Resin Art Set product photo, view 3 — Artline resin supplies

Belen Ortego Resin Art Set


icon Purchase now to get on August 28th
shipping Review shipping feesFree for EU orders over €150
€37,00
€37,00
Volume

Apply the promo code BELENRESIN at checkout to get 15% off ✨

PRODUCT DESCRIPTION

This set brings together the top products recommended by our ambassador and resin artist Belen Ortego — carefully selected based on her real experience working with epoxy.

👉 Discover her work here: @belenortegoresin

Use her exclusive code BELENRESIN for 15% off

These are not just random materials — they are proven bestsellers that work perfectly together and help you create beautiful, reliable results.

💡 With this set, you’re following a real artist’s workflow and using the same products she trusts in her own creations.

✔ Artist-recommended bestsellers
✔ Selected to work beautifully together
✔ Perfect for beginners and creative resin projects
✔ Based on a real artist’s workflow

Now it’s your turn to create ✨

HOW TO USE AND COMBINE PIGMENTS FROM THIS SET

🧪 1. Prepare your resin

Mix Crystal Epoxy Resin according to the instructions. Stir slowly for 3–5 minutes, scraping the sides and bottom of the cup.

🥤 2. Divide the resin

Pour small amounts of mixed resin into separate cups — one cup for each color/effect.

🎨 3. Create your base colors

Add liquid colorants: White for soft cloudy/marble effects, Blue for ocean depth, Black for contrast and dramatic details.

✨ 4. Add sparkle

Mix a small amount of glitter into separate cups or sprinkle it directly into the mold: Gold for warm highlights, Silver for shine, Red for accents, Black for depth.

🌊 5. Pour in layers

Start with clear resin, then add white for waves/marbling. Add black carefully in small lines or drops for contrast.

🪄 6. Use a stick to create effects

Gently drag a wooden stick through the colors to create swirls, waves, or marble patterns. Do not overmix.

💎 7. Finish with glitter details

Add glitter on top or near the edges for a more decorative look.

⏳ 8. Let it cure

Leave the mold on a flat surface, away from dust and humidity, until fully cured.